Glossary management function MTrans Online User Guide
The glossary management function is used to manage the glossary data used in the feature to apply terminology. This function is only available to customers who have subscribed to our term adaptation function.
- About the glossary list view
- Create a glossary
- Search for a glossary
- Refresh the glossary list view
- Rename a glossary
- Control access to a glossary
- Delete a glossary
- Import a glossary file
- Export a glossary
- Glossary file format specification
- Glossary management function - Manage terms
- Revision history
Click ![]() (Glossary icon) in the sidebar to open the glossary management screen.
(Glossary icon) in the sidebar to open the glossary management screen.
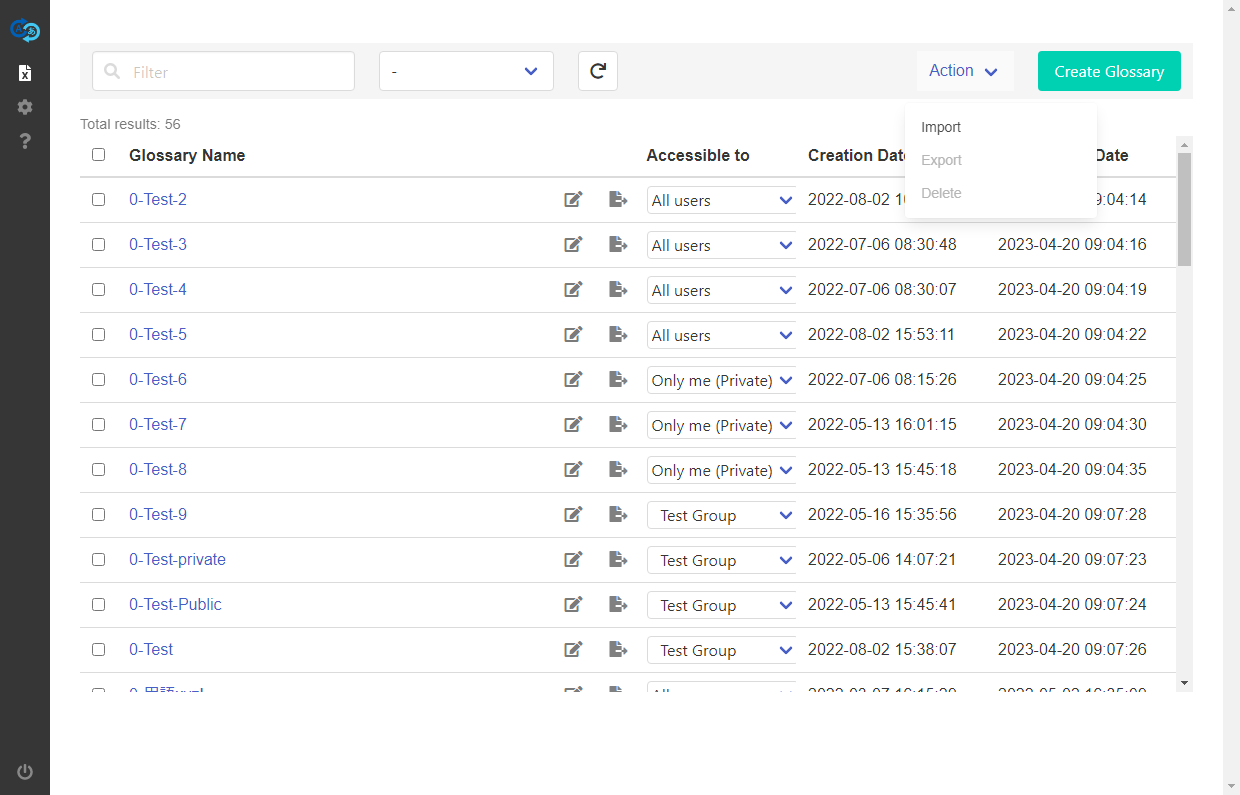
About the glossary list view
When you open the glossary management screen, the created glossaries are displayed in a list format. However, private glossaries or those accessible to a specific user group will not be displayed to users who are not authorized to access them. For more information on restricting access to glossaries, see Control access to a glossary.
Create a glossary
To create a glossary, click the "Create Glossary" button in the header menu. The input screen appears. Set the glossary name and the access setting, then press the "OK" button. For more information about the access setting, see Control access to a glossary.
Search for a glossary
To search for a glossary, type a keyword in the Filter box on the header menu. Glossaries that partially match the glossary name will be displayed. You can also use the pull-down next to the Filter box to view glossaries with the selected access setting.
Refresh the glossary list view
To refresh the glossary list view, click ![]() in the header menu.
in the header menu.
Rename a glossary
To rename a glossary, click ![]() . After you rename it, click the "Save" button to save it.
. After you rename it, click the "Save" button to save it.
Control access to a glossary
Data managers can allow or deny specific users to access to a glossary. To control access to a glossary, select the pull-down item in the "Accessible to" column of the glossary list. There are three access types: All users, Private, and Specific group.
All users
To make the glossary accessible to all users, select "All users" from the pull-down in the "Accessible to" column. This allows all data managers to edit and view the glossary and all other users to only view it.
Private
To deny access to the glossary to anyone other than yourself, select "Only me (Private)" from the pull-down in the "Accessible to" column. This will prevent the glossary from appearing in the glossary list for other users other than yourself, and they will not be able to access to it.
Specific group
To make the glossary accessible to a specific group, select the user group from the pull-down in the "Accessible to" column. This allows only users who are registered as members of that user group to access to the glossary.
About user groups: User groups represent a group of specific users (e.g., department, project team, etc.). If you want to restrict access to a glossary to a specific user group, you need to create the user group and register a data manager as a member in advance.
* Data type:
- Glossary
- MT Prompt Set
- Auto Post-Editing Condition Set
- AI Prompt Set
- AI Proofing Rule Set
If the data manager is not registered as a member of the user group, they will not be able to select and allow that user group to access a glossary. For more information on creating user groups and registering members, see User group management function. You can also change who can access the glossary by adding or removing members from the user group after making the glossary accessible to the user group.
Delete a glossary
To delete a glossary, you must select the glossary by checking the checkbox at the beginning of the row in the glossary list. If you check the checkbox in the header of the glossary list, you can select all the glossaries. You can also deselect all glossaries by unchecking the box. After selecting a glossary, click the "Actions" > "Delete" menu in the header menu. A confirmation screen will appear. Press the "Yes" button.
Import a glossary file
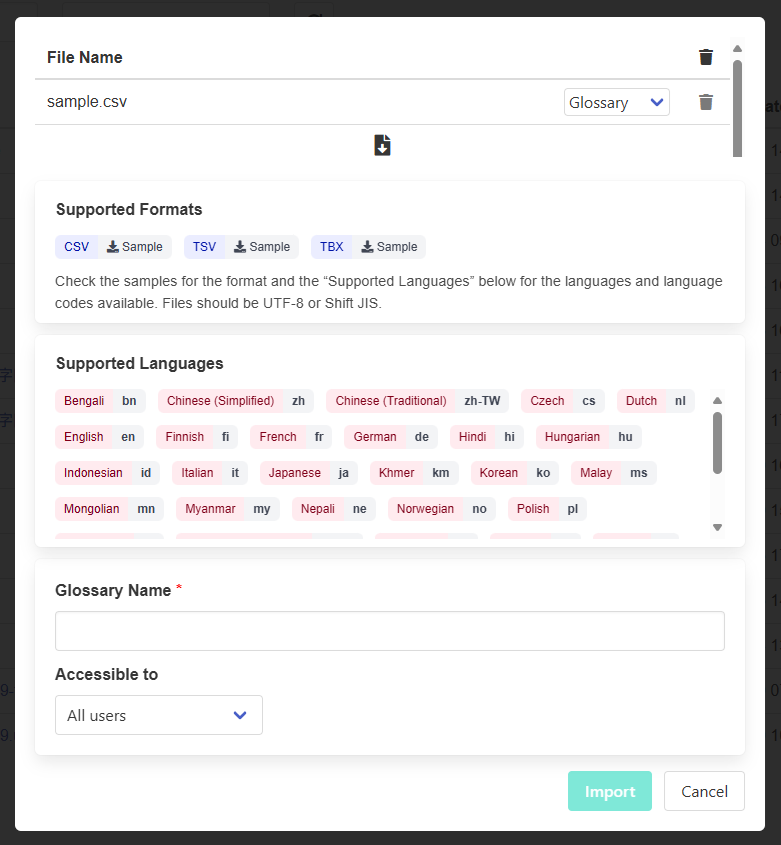
You can import a glossary file in CSV, TSV or TBX format. Files must be UTF-8 or Shift JIS. For details on how to write glossary files in each format, refer to Glossary file format specification or download the sample files for each format from the "Supported Formats" panel on the glossary import screen.
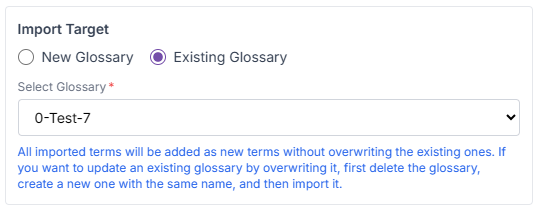
When importing into an existing glossary
If you are importing into an existing glossary, click the glossary you want to import into to open the term list page, and then click "Actions" > "Import" in the header menu.
In the "Import Target" pane, the selected glossary is set as the target glossary for import.
Add the glossary file you want to import, and then click the "Import" button. The request will be sent and a notification e-mail will be sent when the import process is complete. Also, the glossary file uploaded to the server for import will be deleted after the import process is complete.
Note: All imported terms will be added as new terms without overwriting the existing ones. If you want to update an existing glossary by overwriting it, first delete the glossary, create a new one with the same name, and then import it.
When importing into a new glossary
When importing into a new glossary, click "Actions" > "Import" in the header menu on the glossary list page to open the glossary import screen.

In the pane at the bottom of the screen, set the name and the access setting for the new glossary. For more information about the access setting, see Control access to a glossary.
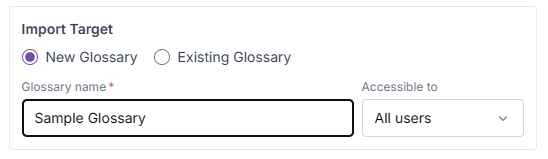
Add the glossary file you want to import, and then click the "Import" button. The request will be sent and a notification e-mail will be sent when the import process is complete. Also, the glossary file uploaded to the server for import will be deleted after the import process is complete.
How to import as a phrase glossary
You can also register phrases in the glossary. To import as a phrase collection, change the "Glossary" pull-down in the uploaded file item to "Phrases" before clicking the "Import" button. For details about phrases, see Select type.
Processing time
If the glossary file is large, it will take longer to complete the import. Refer to the table below for an estimate of the import processing time.
| File size | Processing time |
|---|---|
| 1.0 MB | 8-10 minutes |
| 1.5 MB | 10-12 minutes |
| 2.0 MB | 12-14 minutes |
Restriction
The total size of glossary files that can be imported at one time is 2.0 MB or less. If you are importing a glossary file that is larger than 2.0 MB in size, you will need to split the file and import it separately. Also, the import function is not available for glossaries with more than 50,000 terms.
Export a glossary
You can export a glossary file in CSV, TSV or TBX format. The terms for each language are exported. To export a glossary, do one of the following to open the export screen.
- Check the checkbox of the glossary you want to export in the glossary list to select it, and then click the "Actions" > "Export" in the header menu.
- Click "Actions" > "Export" menu of the header menu in the term list.
To check the progress of the export or to download the exported glossary, click on ![]() (Show the export result) in the glossary list to open the "Export" panel in the "Details" tab.
(Show the export result) in the glossary list to open the "Export" panel in the "Details" tab.
For details on the format of the exported glossary file, refer to Glossary file format specification.
Glossary file format specification
Glossary files can be imported and exported in CSV, TSV, or TBX format. Each format is as follows.
CSV / TSV
CSV and TSV format glossary files support the following two formats:
1. Glossary with terms only
- 1st row: Header row. Specify the language code.
- 2nd row and onward: Term rows. Specify the term for each language.
For example, to import or export the following glossary:
| English | Japanese | French |
|---|---|---|
| Hello | こんにちは | Bonjour |
| MTrans | MTrans | MTrans |
| Note | ノート | Note |
CSV format:
en,ja,fr
Hello,こんにちは,Bonjour
MTrans,MTrans,MTrans
Note,ノート,Note
2. Glossary with phrases and case options
- 1st row: Header row. Type, language code, and case options for each language.
- Type:
term-type - Case sensitivity option for each language:
<language-code>_s-case-sensitive - Case conversion option for each language:
<language-code>_t-case-conversion
- Type:
- 2nd row and onward: Term rows. Specify type, term for each language, and case options.
- Type
Value Description Blank (no input) or 0Term (default) 1Phrase - Case sensitivity option
Value Description Blank (no input) or 0Ignore case (default) 1Distinguish case - Case conversion option
Value Description Blank (no input) or 0Default 1Fix 2Match
- Type
For example, to import or export the following glossary:
| Type | English | English case sensitivity | English case conversion | Japanese | Japanese case sensitivity | Japanese case conversion | French | French case sensitivity | French case conversion |
|---|---|---|---|---|---|---|---|---|---|
| Term | Hello | Ignore case | Default | こんにちは | Ignore case | Default | Bonjour | Ignore case | Default |
| Term | MTrans | Distinguish case | Fix | MTrans | Distinguish case | Fix | MTrans | Distinguish case | Fix |
| Term | Note | Distinguish case | Match | ノート | Distinguish case | Match | Note | Distinguish case | Match |
| Phrase | This is a phrase. | - | - | これはフレーズです。 | - | - | Ceci est une phrase. | - | - |
CSV format:
term-type,en,en_s-case-sensitive,en_t-case-conversion,ja,ja_s-case-sensitive,ja_t-case-conversion,fr,fr_s-case-sensitive,fr_t-case-conversion
,Hello,0,0,こんにちは,0,0,Bonjour,0,0
,MTrans,1,1,MTrans,1,1,MTrans,1,1
,Note,1,2,ノート,1,2,Note,1,2
1,This is a phrase.,,,これはフレーズです。,,,Ceci est une phrase.,,
For more information about each option item, see below:
| Item | Related section |
|---|---|
| Type | Select type |
| Case sensitivity option | Specify case sensitivity |
| Case conversion option |
TBX
Glossary files in TBX format can only be imported and exported with terms. The structure of TBX format glossary files is as follows:
<martif>element: Root element<text>element: Contains glossary data<body>element: Contains term entries<termEntry>element: Represents each term entry<langSet>element: Contains terms for each language. Specify the language code in thexml:langattribute.<tig>element: Contains term information<term>element: Represents the term
For example, to import or export the following glossary:
| English | Japanese | French |
|---|---|---|
| Hello | こんにちは | Bonjour |
TBX format:
<?xml version="1.0" encoding="UTF-8"?>
<!DOCTYPE martif SYSTEM "TBXBasiccoreStructV02.dtd">
<martif>
  <text>
    <body>
      <termEntry>
        <langSet xml:lang="en">
          <tig>
            <term>Hello</term>
          </tig>
        </langSet>
        <langSet xml:lang="ja">
          <tig>
            <term>こんにちは</term>
          </tig>
        </langSet>
        <langSet xml:lang="fr">
          <tig>
            <term>Bonjour</term>
          </tig>
        </langSet>
      </termEntry>
    </body>
  </text>
</martif>
Glossary management function - Manage terms
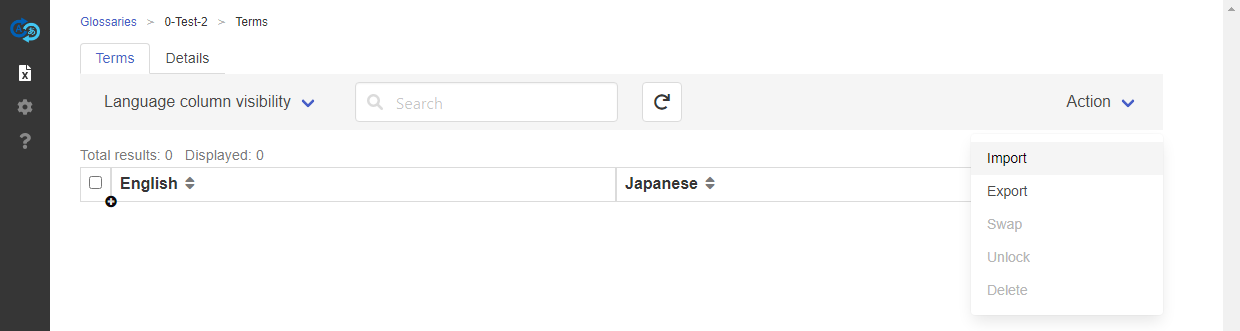
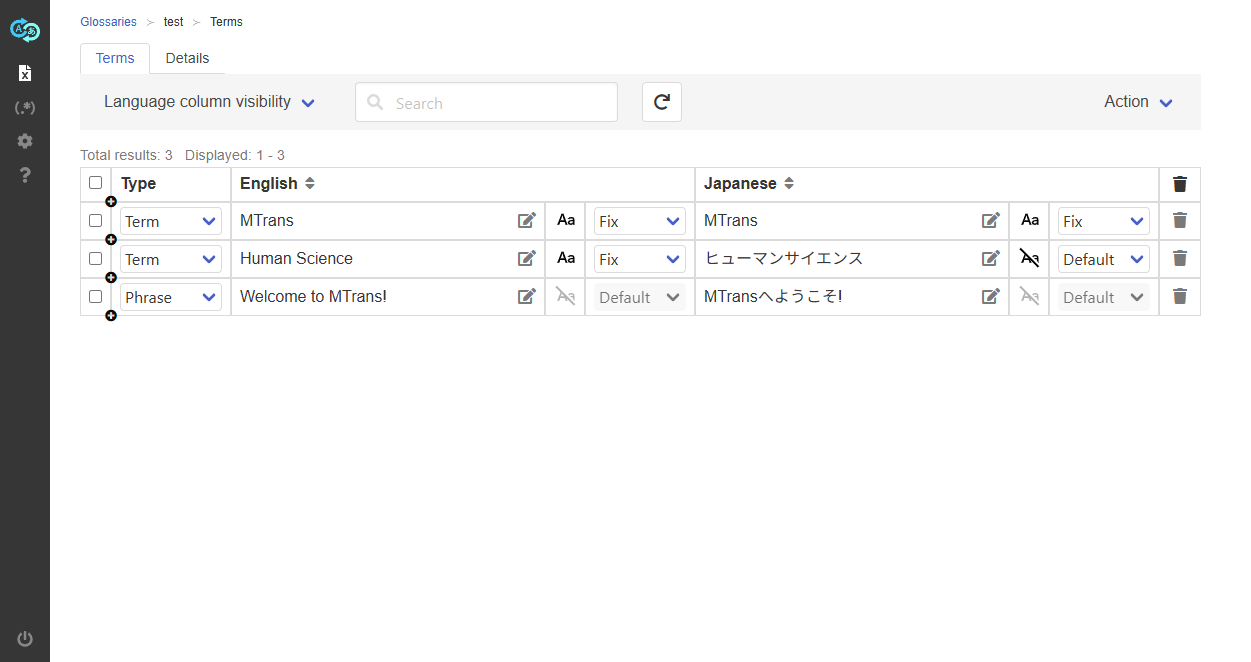
To register and manage terms in a glossary, click the glossary name on the glossary management screen to display the term list.
About editing permissions
Data managers can edit all glossaries they have access to, but other users can edit only glossaries they have created on their own. For more information on restricting access to glossaries, see Control access to a glossary.
Supported languages
The following languages are supported:
| Language | Language code |
|---|---|
| Italian | it |
| Indonesian | id |
| Ukrainian | uk |
| Dutch | nl |
| Khmer | km |
| Sinhala | si |
| Swedish | sv |
| Spanish | es |
| Thai | th |
| Tagalog | tl |
| Czech | cs |
| German | de |
| Turkish | tr |
| Nepali | ne |
| Norwegian | no |
| Hungarian | hu |
| Hindi | hi |
| Finnish | fi |
| French | fr |
| Vietnamese | vi |
| Bengali | bn |
| Polish | pl |
| Portuguese | pt |
| Portuguese (Brazil) | pt-BR |
| Malay | ms |
| Burmese | my |
| Mongolian | mn |
| Romanian | ro |
| Russian | ru |
| English | en |
| Korean | ko |
| Chinese (Simplified) | zh-CN |
| Chinese (Traditional) | zh-TW |
| Japanese | ja |
Set the language to display
The term list consists of columns for each language, showing the terms in each language. To display the language column, click "Language column visibility" in the header menu, and then click the menu item for the language you want to display. Languages with ![]() (check mark) will be displayed, and languages without
(check mark) will be displayed, and languages without ![]() (check mark) will be hidden. The language columns are displayed in the order you check the languages.
(check mark) will be hidden. The language columns are displayed in the order you check the languages.
Register a term
To register a term, click ![]() at the beginning of each row in the term list to insert a row, and then click the term cell in each language column. After entering the term, press Enter or click
at the beginning of each row in the term list to insert a row, and then click the term cell in each language column. After entering the term, press Enter or click ![]() to save it.
to save it.
Restriction
For glossaries with more than 50,000 terms, it is not possible to add terms by inserting new rows.
Select type
For each term, you can select either "Term" or "Phrase" as the type.
- Term: Register a single word or compound term. This is the default type.
- Phrase: Register a phrase or sentence. Applied to translation only when there is an exact match.
To select the type, click the pull-down in the "Type" column for each row in the term list and select the desired type.
Specify case sensitivity
There are two options for specifying how to handle case sensitivity for each term. You can set these at the end of each language column. These options are only available when the type is "Term." If the type is "Phrase," these options cannot be used.
1. Case sensitivity option
Specify whether to distinguish between uppercase and lowercase when searching for the term in the source text.
| Icon | Description/Example |
|---|---|
| Ignore case (default). If "MTrans" is registered as a term in the source language, "mtrans" and "MTRANS" are also searched as the same term. |
|
| Aa | Distinguish case. If "MTrans" is registered as a term in the source language, "mtrans" and "MTRANS" are considered different terms and are not searched as the same term. |
2. Case conversion option
Specify how to modify the case style when the term is used as a translation.
| Pull-down item | Description/Example |
|---|---|
| Default | Modify case according to grammar and context (default). If "Note" is registered as a term in the target language, it will be used as "Note" at the beginning of a sentence and "note" in the middle of a sentence. |
| Fix | Do not modify case regardless of grammar or context. If "Note" is registered as a term in the target language, it will always be used as "Note" even at the beginning or in the middle of a sentence. |
| Match | Modify case to match the case style of the corresponding term in the source text (all lowercase, initial capital, or all uppercase). If "Note" is registered as a term in both source and target languages, it will be used as "note" if the source is "note", as "Note" if the source is "Note", and as "NOTE" if the source is "NOTE". |
Search for a term
To search for a term, type a keyword in the search box on the header menu and press the Enter key.
Refresh the term list view
To refresh the term list view, click ![]() in the header menu.
in the header menu.
Delete a term
To delete a term, click ![]() at the end of the line in the term list. A confirmation message will appear. Press the "Yes" button. To delete multiple terms at once, you must select the terms by checking the checkboxes at the beginning of the rows in the term list. If you check the checkbox in the header of the term list, you can select all the terms on the current page. You can also deselect all terms by unchecking the box. After selecting terms, click the "Actions" > "Delete" menu in the header menu. A confirmation screen will appear. Press the "Yes" button.
at the end of the line in the term list. A confirmation message will appear. Press the "Yes" button. To delete multiple terms at once, you must select the terms by checking the checkboxes at the beginning of the rows in the term list. If you check the checkbox in the header of the term list, you can select all the terms on the current page. You can also deselect all terms by unchecking the box. After selecting terms, click the "Actions" > "Delete" menu in the header menu. A confirmation screen will appear. Press the "Yes" button.
Swap terms
In our term adaptation function, terms are applied to the machine translation in the order of the term list from the top. To swap terms and change the order of the term adaptation, select two terms by checking the checkboxes at the beginning of the rows, and then click the "Actions" > "Swap" menu in the header menu.
Unlock a term
As for glossaries accessible to all users and those accessible to a specific user group, when you edit or sort a term of them, the term is locked so that it is not affected by other users' operations. Locks are applied on a line-by-line basis across languages. For example, while you are editing an English term, other users will not be able to edit not only English but also Japanese and other terms. While a term is locked, the following operations are restricted:
- Edit a term in other languages
- Delete a term
- Swap terms
- Sort terms (overall)
All terms are locked while the term sorting (overall) is running.
The term lock will be automatically released after 5 minutes from the start of the lock. To force an unlock, click the "Actions" > "Unlock" menu in the header menu. However, the lock by sorting terms (overall) cannot be forced to be released.
Revision history
March 3, 2026
- Updated the site images and icons to the renewed version
- Updated the description of the glossary import screen
- Deleted the description of the term sorting function
October 20, 2025
- Added "Glossary file format specification".
- Added "About editing permissions" and "Supported languages" to "Manage terms"
September 25, 2025
- Added "How to import as a phrase glossary".
- Added "Select type".
- Added "Specify case sensitivity".
- Deleted explanations related to the part-of-speech setting function due to its abolition.
August 1, 2025
- Changed the name of the user privilege "User Manager" to "Data Manager"
July 25, 2024
- Added that users other than data managers can create and edit private glossaries.